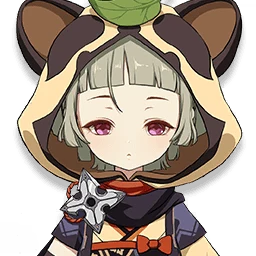
Sayu combines Anemo damage and movement from her rolling skill with a Burst that heals and leaves a Daruma to attack or heal based on nearby conditions. Use her when you want healing alongside Anemo utility, or when her controllable roll is useful for moving through the world.
ElementAnemoWeaponClaymoreRarity4
Sayu GUIDE
Understand Sayu
Useful when…
Burst healing when multiple characters need recovery
A healing and attacking Daruma during combat
Anemo skill movement and elemental absorption
Avoiding startling Crystalflies and certain wildlife
Skill handling and elemental absorption
Yoohoo Art: Fuuin Dash has a quick Press version that rolls a short distance and ends with a Whirlwind Kick. Holding it lets Sayu steer a Windwheel for up to 10 seconds, with increased interruption resistance; she can end the roll early with the skill button, producing a stronger kick. The longer the roll lasts, the longer the cooldown, which is listed from 6 to 11 seconds. The Hold version can absorb Hydro, Pyro, Cryo, or Electro if Sayu contacts that element while rolling, adding damage of that element; absorption can happen only once per use. This makes route and contact matter: do not expect the extra element if she never touches an eligible source, and do not treat the roll as a fixed-duration attack when you can stop it early.
Healing, support, and investment
Yoohoo Art: Mujina Flurry costs 80 Energy and lasts 12 seconds, with a 20-second cooldown. Its initial cast deals Anemo damage and heals all nearby party members based on Sayu's ATK, then summons the Muji-Muji Daruma. At intervals, the Daruma attacks a nearby opponent if nearby characters are above 70% HP. If an active nearby character is at 70% HP or lower, it heals the active character with the lowest percentage HP. If no opponents are nearby, it heals nearby active characters even above 70%. This makes its behavior responsive to the immediate situation, rather than a purely offensive or purely healing summon. The passive Someone More Capable also heals all characters and nearby allies by 300 HP plus 1.2 HP per point of Sayu's Elemental Mastery when she triggers Swirl or Stellar Swirl while active, once every 2 seconds. The Burst is the clear talent priority if you depend on its healing and Daruma; invest in the skill if its roll damage and movement matter in your use. Normal attacks are a separate damage track.
Limitations and exploration details
The Daruma's choice depends on nearby HP and opponents, so its attack mode can change to healing when an active nearby character crosses the stated threshold. Its base healing scales with Sayu's ATK; the Swirl-triggered passive instead adds healing based on Elemental Mastery. Her wildlife passive prevents her from startling Crystalflies and certain other animals when approached, but it applies only to listed creatures. The skill's Hold duration can be as long as 10 seconds and its cooldown increases with duration, so a long roll delays the next use.
Limitations and tradeoffs
The Hold skill offers directional mobility and interruption resistance, while longer use incurs a longer cooldown.
The Daruma can attack or heal according to the situation, so its behavior is not fixed for the whole duration.
Common mistakes to avoid
Holding the skill for its full duration and expecting the shortest cooldown.
Assuming the Daruma always attacks or always heals without checking nearby HP and enemies.
Expecting elemental absorption without contacting Hydro, Pyro, Cryo, or Electro during the Hold skill.
Effects and reference details
Shuumatsuban Ninja Blade · Normal attack
Normal Attack Performs up to 4 consecutive strikes.
Charged Attack Drains Stamina over time to perform continuous spinning attacks against all nearby opponents. At the end of the sequence, performs a more powerful slash.
Plunging Attack Plunges from mid-air to strike the ground below, damaging opponents along the path and dealing AoE DMG upon impact.
Purchased talent coefficients at level 1 and 1. These are individual skill values; they do not represent total build damage.
Effect
Level 1
Level 1
1-Hit DMG
72.2%
72.2%
2-Hit DMG
71.4%
71.4%
3-Hit DMG
43.4%+43.4%
43.4%+43.4%
4-Hit DMG
98.1%
98.1%
Charged Attack Spinning DMG
62.5%
62.5%
Charged Attack Final DMG
113%
113%
Charged Attack Stamina Cost
40.0/s
40.0/s
Max Duration
5.0s
5.0s
Plunge DMG
74.6%
74.6%
Low/High Plunge DMG
149%/186%
149%/186%
Yoohoo Art: Fuuin Dash · Elemental skill
The special technique of the Yoohoo Ninja Arts! Sayu curls up into a rolling Fuufuu Windwheel and smashes into opponents at high speed, dealing Anemo DMG. When the duration ends, she unleashes a Fuufuu Whirlwind Kick, dealing AoE Anemo DMG.
Press Enters the Fuufuu Windwheel state, rolling forward a short distance before using the Fuufuu Whirlwind Kick.
Hold Rolls about continuously in the Fuufuu Windwheel state, increasing Sayu's resistance to interruption while within that state. During this time, Sayu can control the direction of her roll, and can use the skill again to end her Windwheel state early and unleash a stronger version of the Fuufuu Whirlwind Kick. The Hold version of this skill can trigger Elemental Absorption.
This skill has a maximum duration of 10s and enters CD once its effects end. The longer Sayu remains in her Windwheel state, the longer the CD.
Elemental Absorption If Sayu comes into contact with Hydro/Pyro/Cryo/Electro while in her Windwheel state, she will deal additional elemental DMG of that type. Elemental Absorption may only occur once per use of this skill.
Purchased talent coefficients at level 1 and 1. These are individual skill values; they do not represent total build damage.
Effect
Level 1
Level 1
Fuufuu Windwheel DMG
36.0%
36.0%
Fuufuu Whirlwind Kick Press DMG
158.4%
158.4%
Fuufuu Whirlwind Kick Hold DMG
217.6%
217.6%
Fuufuu Windwheel Elemental DMG
16.8%
16.8%
Fuufuu Whirlwind Kick Elemental DMG
76.2%
76.2%
Max Duration (Hold)
10.0s
10.0s
CD
6.0 to 11.0s
6.0 to 11.0s
Yoohoo Art: Mujina Flurry · Elemental burst
The other super special technique of the Yoohoo Ninja Arts! It summons a pair of helping hands for Sayu. Deals Anemo DMG to nearby opponents and heals all nearby party members. The amount of HP restored is based on Sayu's ATK. This skill then summons a Muji-Muji Daruma.
Muji-Muji Daruma At specific intervals, the Daruma will take one of several actions based on the situation around it: ·If the HP of nearby characters is above 70%, it will attack a nearby opponent, dealing Anemo DMG. ·If there are active characters with 70% or less HP nearby, it will heal the active character with the lowest percentage HP left. If there are no opponents nearby, it will heal active characters nearby even if they have 70% HP or more.
Purchased talent coefficients at level 1 and 1. These are individual skill values; they do not represent total build damage.
Effect
Level 1
Level 1
Skill Activation DMG
117%
117%
Skill Activation Healing
92.2% ATK+577
92.2% ATK+577
Muji-Muji Daruma DMG
52%
52%
Muji-Muji Daruma Healing
79.9% ATK+500
79.9% ATK+500
Duration
12.0s
12.0s
CD
20.0s
20.0s
Energy Cost
80
80
Someone More Capable
When Sayu triggers a Swirl or Stellar Swirl reaction while active, she heals all your characters and nearby allies for 300 HP. She will also heal an additional 1.2 HP for every point of Elemental Mastery she has. This effect can be triggered once every 2s.
No Work Today!
The Muji-Muji Daruma created by Yoohoo Art: Mujina Flurry gains the following effects: ·When healing a character, it will also heal characters near that healed character for 20% the amount of HP. ·Increases the AoE of its attack against opponents.
Yoohoo Art: Silencer's Secret
When Sayu is in the party, your characters will not startle Crystalflies and certain other animals when getting near them. Check the "Other" sub-category of the "Living Beings / Wildlife" section in the Archive for creatures this skill works on.